Fishwhittler
Members
-
Joined
-
Last visited
Everything posted by Fishwhittler
-
The hook hangers are about 3 1/2" apart and I used size 2 hooks, so they won't tangle much. I did this one with rattle cans. I don't have an airbrush yet, but I do want to get one sometime.
-
Thanks for the kind words. I hope you catch some big ones! Ben
-
Yea, I'm never going fishing again without a camera and/or a tape measure. :-/
-
. . . But it was the biggest bass I've caught to date (unfortunately I didn't have a camera or tape measure with me :'(). It looked to be in the 18-20" range, and I estimated its weight at about 5 pounds. I've caught several 16" bass before, and this fish was big enough to make two of them. I caught it on a 3.25" Yum crawbug in green pumpkin, which is a bait that I've had for a while but haven't really used. I'll be using them a lot more from now on.
-
That looks really good. 8-)
-
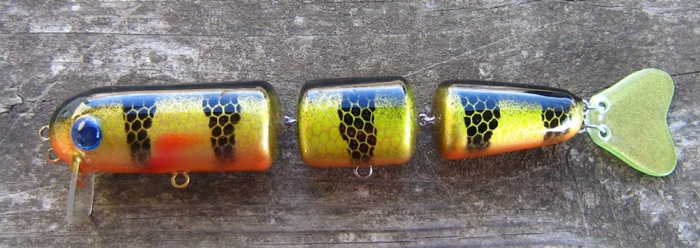
I may try v-joints in the next one I do, but for my first time making this style of bait I kept it simple and used straight joints. V-joints would definitely make more noise than straight joints, but I think the lure segments are close enough in this one so that there will still be some noise. The joints have plenty of room for movement; they just look cramped because I kept the internal diameter as small as I could without making it to tight, so as to keep the wire from deforming under pressure.
-
-
Here's a swimbait I was requested to make. It's 8" long and weighs 2 oz. It has two line ties and they each give a different action; the upper one gives a tight action with most of the action in the tail sections and it dives about 6", and the lower line tie gives a wider action with the bait just breaking the surface.

-
I like all of them, but the bluegills and the shellcracker are my favorites. 8-)
-
The craws at the bottom are amazing.
-
Correct me if I'm wrong, but I think this is how it works: Moving the ballast weight higher in the bait raised the bait's center of gravity. This made the bait less stable, and so less force is required to move the bait. However, the lip angle stays the same and so the same amount of force as before is being applied by the bill to the bait. Therefore, with a less stable bait but the same bill angle and line tie placement, you get a bait with a wider action even though the baits external appearance is the same as before.
-
Those are gorgeous! I really like the middle one. 8-)
-
I use three grits of sandpaper: 80, 120 and 220 in that order. What I do is smooth out the knife strokes with the 80, then smooth it some more with the 120 and finally go over it real well with the 220. You may have to hit it several times with the 120 and 220 before all of the marks are gone but eventually you should end up with a smooth bait.
-
I'm using PVC trim board; I got an eight-foot 1x4 at Menards for $20. Here's another pic of a wooden bait that I'm doing the same way. One thing I forgot to mention before is that you should use a finish nail or a piece of wire to keep everything strait while it's gluing. Make sure the nail is completely smooth or the epoxy may stick to it and make it difficult to remove it without damaging the bait.
-
I came up with this idea the other day. I was trying to find a way to avoid using filler to smooth around the belly line hook hanger/weight, and I inadvertently ended up widening the action; actually the modified action is closer to what I originally intended for this bait. The following pics show how I did it. Note: I drilled the pilot hole in the belly before I did any of the following. Here's the baits completely carved and sanded. The sinker is about 1/4" higher in the bait than in my standard bait which destabilizes the bait somewhat. I could have just drilled a deeper hole in the belly, but that wouldn't have accomplished what I intended (to avoid using filler). Also I think that this method is slightly stronger as I don't have to fill in a big hole in the belly. The advantages of this method are: 1. You get a different action with the exact same bait profile 2. The weight of the bait stays the same 3. No filling is required around the belly hook hanger The same thing could be done with a wood bait. You just need to make sure that you don't install the weight too high in the bait. A good place to start would be moving the weight 1/2 of its length up in the bait. In other words, if you have a weight that is 1/2" long, you should move it about 1/4" higher in the bait. Thanks for reading. Ben
-
-
Thanks Big M. I also like building baits by trial and error. When I come up with a new lure design I make a new template with the bill slot, hardware attachment points and weight points marked on it; it saves time down the road trying to remember how I did it the first time. So now I have about three or four different templates for this body style, each one with different bill angles and line tie location. The weight amount/placement doesn't seem to need much adjusting for this body style. On the 1" thick version I put a 1/4oz. sinker in the belly and add a few 3/4 inch long twists of 16 gauge copper wire (poor mans lure weight) for both the wake bait and the shallow diver; the 3/4" thick version of the same body style needs only the 1/4oz. sinker. Probably if I was going to turn this body shape into a deep diver I would add another 1/8oz. weight in front of the belly hook hanger, but it might not need it. I've also been experimenting with moving the weight up and down in the lure body to change the baits action. Fun stuff.
-
Here's a wake bait I've been working on. 3" long, made of 1" pine, weighs 1oz. It's my first wake bait that actually works the way I want it to; most of my other attempts at wake baits have ended up either rolling to far and spinning on retrieve or not rolling at all. For this one I took a shallow diving lure body, cut the bill slot at about 75-85 degrees and moved the line tie right down onto the bill. It uses the same amount of ballast as the shallow diver and has a very wide roll. Now that I've got a design that works I'm going to try making one out of 3/4" PVC instead of 1" pine. Thanks for looking. Ben
-
Awesome bait! The paint job is very nice. 8-)
-
Thanks guys. I'll probably still use wood for some baits, although the PVC is really nice. There are some difficulties with carving PVC, but on the other hand you can get a uniform bait easier because you don't have to deal with the woodgrain. The main problem I've found with PVC so far is that it overheats much easier than wood, and with nastier results :-X.
-
A while back I posted a PVC crankbait I was working on. Since then I have been suffering from W.L.M.W.D. (Winter Lure Making Withdrawl Disorder ;D). I'm finally back at lure building, and I've nearly got my first PVC crank finished; all it needs is another coat of epoxy. I was going for a color similar to the Megabass "Aka Tora" color. Let me know what you think. Ben
-
Very nice! 8-)
-
Awesome bait! You should put rattles in the tail of the next one you do...
-
I haven't done a whole lot of swimbaits but I made some catfish swimbaits for a guy (see below). I could also build them without whiskers as a different kind of fish. PM me if you're interested.
-
Cool baits! The four in the bottom two pics are awesome. 8-)