Fishing Rhino
Super User
-
Joined
-
Last visited
Everything posted by Fishing Rhino
-
They've still got to unbolt the hold downs or whatever you call them. In the case of my truck, they'd have to remove four bolts to get a corner brace out of the way, then remove the clamp that holds the battery in place. The battery is tucked part way under the left fender, against the cabin firewall, and beneath said corner brace. They want easy pickings and they know which batteries are readily accessible. Same with the lock on a pickup tailgate. There are plenty of pickups around and most do not have the tailgate locked. It's a waste of their time to break the lock, and end up with a damaged tailgate. None of the deterrents prevent theft. Unless the thief has an order for a particular item or automobile, they will grab the easiest pickings.
-
Don't get the regular golf gloves. The ones I have are rain gloves which are a little thicker than the thin leather or fake leather gloves. And, be sure to get them for both hands. Golf gloves are sold as singles.
-
I usually keep mine locked, always when away from home. For those who don't have locking tailgates, back your truck up to a wall, pole, tree, or whatever when you park it. Then it cannot be opened far enough for removal.
-
I don't know about the later models, but my 07 New Sierra pickup can have its tailgate taken off in seconds. The cables have a clip at the top which makes for easy removal. The clip has a large hole with a slot toward the end of the cable. Release the clip, push the cable so the large hole is lined up with the head of the support "bolt" and slide it over the head. The cable is now separated. The bottom is the same as every other pickup I have owned. There is a cup on each side at the bottom. The cup on the passenger side has a section cut out of it. After unclipping the cables, lift the tailgate to a 45 degree angle, and lift it on the passenger's side. The notch allows it to lift free from the mount on the truck. Bring the tailgate away from the body on the right side. Once it's clear of the body, slide it to the right. That's it. Can easily be done in less than a minute. No wrenches or tools required. Maybe some trucks are different, but these directions apply to all brands of trucks according to the results I got from a google search.
-
Starting from north to south. If there are particular areas you'd like to see enlarged, let me know. At least this is a start for you. Here's an enlarged area.
-
Welcome to BR from a Westport neighbor. We've got a group of guys who get together once a month to fish different waters in this area. Nothing serious, just a chance to get to meet fellow members. Check this out, and if you're interested, chime in on this thread. We have an open seat which goes to the first come, first served.
-
Looks like an umbrella rig to me. I used umbrella rigs in the early 70s when I was "meat fishing" for stripers and the minimum size was 16 inches. Umbrella rigs had as many as six arms with up to three baits per arm, plus one in the center. When I resumed fresh water fishing in 08, I saw umbrella rigs with small swimbaits attached to the arms for freshwater fishing. It sure wasn't much sport when you'd have up to seven stripers fighting each other on that contraption. It was like draggin in a five gallon bucket. They were effective. Had to have roller guides on the rod since we used monel line to get the rig down on, or near the bottom.
-
You put it into the screw's slot, apply counterclockwise pressure, and the handle will back out a bit. Then you hit it with the hammer. It is designed to "shock" the screw loose while keeping the driver bit firmly in the slot. The question is, how hard do you hit it? Maybe an impact gun/driver like they use to remove and apply lug nuts on wheels would be less likely to damage the housing, and therefore safer in inexperienced hands. I'd be surprised if they didn't have screwdriver bits for them. Check with the place where you buy tires or have your vehicle serviced. They may be willing to help you out for a few bucks. Again, Way2slow will know better than I if the impact gun/driver is a practical alternative, or how hard you can hit the impact driver with a hammer. I've used these tools in my past. It's just that the thought of hammering on my lower unit would make me nervous.
-
This reminds me of the urban legends regarding lobster bait. Some old timers swore up and down that a brick soaked in kerosene, or a used oil filter would catch lobsters like crazy. Supposedly the oil attracted them. I don't know about that since I never tried it. Tried a bunch of other things like road kill, cowhide, stinky cheese (once), cat food by punching holes in the tin cans, plus putting empty coca cola cans in a trap, kinda like a rattle in a lure, I'd guess. Road kill was a mess. Once in a while it would attract a lobster, but the road kill was messy as heck. It would gradually decompose to a slimy mess. Cowhide softened and swelled, but it was ineffective. It did withstand the onslaught of sand fleas very well. The coke cans? No noticable difference compared to the canless traps. Cat food worked but made for very expensive bait. Too expensive to use unless it produced a dramatic increase in catch rates. The cheese however was an unqualified success. The next time we hauled the cheese baited trap we took over ten pounds of lobsters out of it. But, one trap does not a scientific study make. No doubt it would have worked well as bait, but would have been cost prohibitive. There was an old gent that used to hang around the dock who sprayed his elbows, knees, and hands with WD40, and his bald head. He was convinced that it was good for his joints. His moniker was Bippy. When he'd start telling his WD40 stories, we'd call him Dippy. He was a good natured guy and took it all with a smile and a laugh.
-
It cannot be big bucks to get the lower unit lube changed. BPS is going to winterize my motor (150hp Merc) in November. They change gear oil, the fuel filter, check the water pump and impeller, grease all the pivot points, check the spark plugs, treat the fuel that remains in the tank. (I put marine StaBil in every time I add fuel) They also fog the engine. Total cost for parts and labor: 139 dollars. That does not include any parts for the water pump that may be needed. You don't say how old your Johnson is, or when the gear oil was last changed. The threads should not be seized. They are not tapered pipe threads. An "O" ring seals (or used to the last time I had an outboard several years ago) the oil in, and water out. So the threads should have lube on them. Way2slow is the man who can answer your question. My advice is don't do something that might cause damage and end up with a problem that will cost big bucks to fix.
-
Actually, yours is the best solution since the tower assumes all responsibility for injuries and damage caused during the tow. I'll defer to your phone call.
-
The two boats in the animation looked like inflatables. The two boats in the video were a Boston Whaler, maybe a Montauk, and a sailboat. It matters not that they were not bass boats. Under calm conditions and at headway speeds the cleats on a bass boat are more than adequate, unless you could rip them out by hand. I've seen small outboard boats handle 55 foot lobsterboats in the side by each method, in the calm waters of a river. The local boatyard uses a small boat to pick up commercial fishing boats at the town dock to take them to the railway for haulout. I just went out to check the cleats on my boat. They are each secured with four bolts. More than adequate for side by side towing in calm waters. But, you are correct, they are not made for towing. Then again, neither is the bow eye or the tie down U-bolts on the stern. In fact no pleasure craft that are used by members on this forum are made for towing. Sometimes circumstances dictate that we use our vessels for unintended purposes. Knowing how to tow in various circumstances comes by learning, either reading or actually doing it. In towing, there is no one size fits all. What's best in open water for long distances is different from what you would use in tight quarters where absolute control over the towed vessel is necessary. Tug boats towing barges behind entering Buzzards Bay headed for the Cape Cod Canal will "drop" the barge. Then they will run the tug up behind the barge and bring the bow into the vee at the stern of the bow. Finally, hawsers connected from the barge to winches on the tug will be tightened until the two vessels become one. This gives the tug operator total control over the combination for the trip through the canal.
-
Sexercise.
-
I couldn't say about the other forums. This is the only one I'm on. If you ask my wife, I spend too much time on this one. It has everything pretty well covered from local to worldwide, at least as far as freshwater fishing, mostly bass, goes.
-
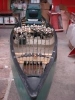
I'm close to being done for the season. As much as I love fishing, I'm ready for some down time. I fish several times a week, a couple of them on my bass boat, and with the price of gas, that doesn't come cheap. Most of the time I fish from my canoe with a trolling motor in a local honey hole. It's only five or ten minutes from my door to the pond. That only costs me a buck or so in gas, and the electricity to recharge the tm battery. An average trip in the bass boat is 25 - 40 dollars in fuel. When the action slows to a crawl, I have a three to four month hiatus. After speedweeks at Daytona, I'll start to get a serious itch, and be ready to rock n roll into the next fishing season.
-
It all boils down to the amount of use, and how they are maintained. That's true of any type of battery. I've just about killed two 29 deep cycle batteries for the 55 pound Minnkota on my canoe in two years. I put them on the charger as soon as I get home, and I alternate batteries, taking only one with me. I use maximum power when moving from one place to another, and often have the motor running constantly in reverse to hold position in against the wind. Therefore, I drain a lot of juice from the battery. There have been days on larger ponds that I have all but killed the battery in 8 - 10 hours of fishing, but I have also traversed the length and breadth of a pond that is a mile and a half long and nearly a mile wide. Right now, the batteries when fully charged, according to the charger barely top 12 volts. New, they were about 13.5, maybe a tenth higher at times. One battery is an interstate, the other a BPS. If I fished half as much, the batteries would last twice as long (approx).
-
I'm speaking from plenty of experience, having been on both ends of tow jobs. I was a commercial lobsterman for more than 25 years with thousands of hours experience on the water in all sorts of conditions. It is the way towing is done in close quarters and narrow channels. In the ocean, a boat is always towed in the usual manner. The rougher the seas, the longer the tow line. When the shelter of the harbor or river is reached the vessels are usually lashed side by each for better control. This is the procedure used by harbormasters in our area whose boats have the tie up cleats that come with Boston Whalers, Makos, Aquasports or whatever brand they may use, and they do it without a problem. They often have to negotiate between moorings to get to a boatyard's dock. It is done as I said, slowly, with only enough power to maintain headway in river currents and eddies. I learned something from the following video. It's better to use two spring lines, and the towed boat should be positioned forward of the boat doing the towing.
-
The best way to "tow" a boat short distances on calm water is not to tow it. Tie it up alongside with fenders between the two boats. Tie a "spring line" from the forward cleat on the towing boat, to the aft cleat on the boat being towed. Then, to keep them together, tie them together forward cleat to forward cleat, and aft cleat to aft cleat. The spring line takes the strain of towing, and the other two keep the boats together. That eliminates the towed vessel from gliding out of control when you slow, or get to the dock/beach. Secured together, the "towed" vessel can be brought alongside a dock, secured to the dock, and then separated from the assisting boat.
-
I didn't realize you were so shy. Speak up man. You should have said something or suggested it. I didn't suggest it because I know nothing about it. I like fishing anywhere, lakes, ponds, rivers or mud puddles. To all, suggestions are welcome. Got a place you'd like us to go, let us know and we'll do what we can to accomodate. The goal is to get to meet other members from this area, and to introduce others to places they haven't fished, and that includes the boaters.
-
This should be a good reminder, particularly to those new to boats, do not take your battery charger for granted, particularly if your boat has an external plug in for the charger. Always check the charger to be sure the power light is on, and the charging light is on when you connect it to a power source.
-
Marine Tex will work, but, after you fill the dings, then sand it to shape, I'm not sure if it will buff out to a gloss that matches the hull. However, since that is not a highly visible area, a slight mismatch of color or shine isn't the critical concern. I had some similar dings on my boat and I used gel coat. But, I have it readily available since I work with fiberglass. It's also trickier to work with unless you flip the boat upside down, since it isn't as thick as the putty. Here's how I'd fix it using the putty. First, clean and apply several coats of wax to the area surrounding the dings. Then, using a dremel or small grinding bit in a drill, scuff up the dings. This does two things. It removes the wax and gives you a rough surface for a good bond. Get a bondo spreader and some wax paper. Catalyze enough putty to fill the dings and match the shape to the hull and the ridges. Make sure you put a little extra putty so you can adequately fill and restore the damaged ridge. Put enough putty on the dings so it is slightly higher than the surrounding area. Then put a piece of wax paper, about six inches square, over the putty. Then using the spreader, work the putty into shape, letting the excess spread over the undamaged area by an inch or so. Then, leave it alone with the wax paper staying in place until the putty cures. Once cured, peel off the wax paper. The excess putty that spread beyond the dings should be able to be scraped off using your fingernail. This excess should be a thin layer. If it's thick when you work it, remove some of the excess. Once you remove the excess your filled areas should be slightly higher than the surrounding surface. Use very fine 600 wet or dry sandpaper to start and finish with 1200. You may sand a bit of the surface around the dings, but that's not a problem. Get some buffing compound and a buffing pad for a drill, or borrow a buffer from a friend if you don't have one. Apply a thin film of buffing compound over the sanded area and buff to a gloss. Don't apply a lot of compound during this process. The buffing pad will spray it everywhere. The pad may get caked with compound. Don't clean the pad. Use a spray bottle and mist the area with water and buff. This does two things. It cools and lubricates the surface and, during the process, the buffing compound breaks down and becomes less aggressive, giving you a better shine. Take your time, and be careful. Unless the color of the putty is way off, you'll have a repair that no one will notice at a casual glance. Here's the Marine Tex. http://www.jamestowndistributors.com/userportal/show_product.do?pid=2088&engine=msn&keyword=marine_tex_epoxy_putty
-
As long as I'm not on the receiving end of one of your hooksets it's fine. For all participants, and interested parties, this will likely be the last go round of the season. However, it would be wise for us to stay in touch, and maybe meet for breakfast or lunch to discuss future events, and changes to the format. We (Gramp, Tate and I) are in agreement that we aren't trying to form a fishing club, at least not one with officers, by-laws, tournaments, etc. But to keep things organized, we should get together to make a list of suggested places to have the get togethers. Maybe we can do a small pond with hp limits or electric motors only. Tate has a jon boat, and I have two canoes, one with a trolling motor and the other with paddle power. Just a suggestion, but one worth considering. Lots of nice ponds on both sides of the Cape Cod Canal and other places in Mass.
-
Aye, and avast yuh swabbies. Either day is AOK.
-
That map is from my Navplanner2 program. It's the same map you will find on a premium Navionics chip for this area. Navplanner2 can be installed on a computer. It includes ponds, lakes, rivers and coastal waters of the contiguous 48 states. Pickwick happens to be a high definition map. The non hi def maps will not give as thorough information as the high def, nor are they accurate regarding position. The Navplanner2 cannot be used in conjunction with GPS electronics such as Humminbird and Lowrance. They need a chip with the info for a particular area of the country to display maps on the screen. The programs can be interfaced. You can mark waypoints for courses on the Navplanner2, and transfer them to a storage data chip. When you plug that into the GPS device, it will download them onto the display for that particular body of water. The Navplanner2 will cost about 130 dollars plus shipping. They may be available at a BPS store. The best price I found, including shipping was from TigerGPS on the 'net. It cost about 130 including shipping.
-
So, it looks like the 29th is a go. Is the Home Depot the meeting spot? What time?