Fishwhittler
Members
-
Joined
-
Last visited
Everything posted by Fishwhittler
-
I don't know what brand I got at Menards; I just bought what they had. I've come across some air holes in the PVC, but not very many. The stuff I ordered online is AZEK, but I don't have it yet so I don't know anything about it.
-
I usually get mine from Menards. I recently ordered some online, but I don't think they've shipped it yet.
-
I just got back from testing it, and it swims very well. It sinks slowly, although I couldn't tell just how fast it sinks because of the wind. I'm going to add a joint at the tail on the next one I do in order to make the action more snake-like. The action on this one is good, but I think it will swim better with the extra joint. Next step: Epoxy in the hardware, and then paint.
-
There used to be, but for some reason it was removed. I posted a link to it in my post above.
-
This should help you get started: Swimbait Compilation Thread I use a scroll saw to cut out my lure blanks. You could use a coping saw if you don't have a scroll saw, and I know some guys use band saws. For shaping, I rough-carve the bait with a knife and then sand the cut edges with a Dremel tool. I use progressively finer grits of sandpaper to smooth out the bait and get it to it's final shape. Hope this helps. Ben
-
Thanks guys. V-man, thanks for the hinge video! I'll give that a shot on the next swimbait I make. I can see how they'll fit better in small baits. BTW that swimbait in the video swims very nicely. 8-) For the scales: I took a wood-burning tool and pressed the tip into the PVC to get the scales. DO NOT PLUG IN THE WOOD-BURNER. I tried using it plugged in, and it's far too hot for PVC. Pressure is all you need for PVC. This scaling technique would also work on wooden lures, but you'd need to plug in the wood-burner. Below is a pic of the tip I used.
-
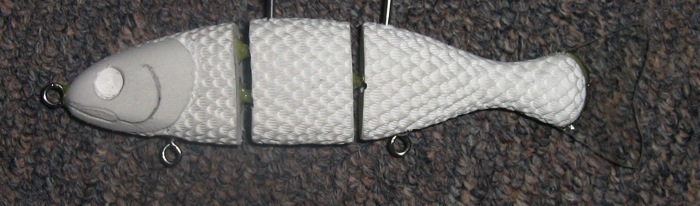
It's not finished, but here's something I put together today. I patterned it after the JSJ Snack Size Swimbait. I don't actually have a Snack Size Swimbait, so I used the pic on *** as my starting point. Mine is 2" smaller; I figured that I should start small and work my way up to larger baits. After building this one, I think that the big ones will be easier, simply because there's much more room in them for ballast and hardware. Anyway, this one is 5" long and made of PVC. Hopefully tomorrow I can test it, and if it works I'll epoxy in the ballast and hook hangers. I did the joints differently in this bait than I have in the past; I usually use the hinges from Dave's twisted wire hinge tutorial, but there wasn't enough room in this bait to use them. I think the next swimbait I make will be a bluegill shape; the deeper body will leave more room for hardware. I'm thinking of painting this bait in either a shad or baby bass pattern, but maybe a trout pattern would look better. The pond where I'll be fishing it has bass, catfish, carp and bluegill (and a few white crappie). I don't use swimbaits hardly at all, so any suggestions are appreciated. So what do you think of it? Ben Note: The pins you see sticking out the top of the lure are just finish nails stuck in so I can test the action. I put them in until I can get some heavy-gauge stainless steel wire for the hinge pins.

-
Very nice work! I really like the first one. 8-)
-
Beautiful work as always! That baby bass is awesome. 8-)
-
I'm speechless... Well not quite. That blue color is one of the coolest paint patterns I've ever seen. Your bluegill looks good too, but the blue really stands out. 8-)
-
I practically never direct tie to crankbaits, and when I do I only do so if the bait has a split ring on the line tie. I mainly use snaps that I make from spring wire. They probably don't last as long as "real" snaps do, but they last long enough and that's all I need. I model my snaps after the Berkley Crosslock snap; that seems to be the most reliable of the designs I've used. I've tried Duolock-style snaps, but they come undone easier. I've never had a Crosslock-style snap come open that I can remember, but a while back I lost a crank or two using Duolock-style snaps, and I haven't used them much since. You can use a pair of pliers to pinch the loop that goes over the shaft a little tighter shut for added security. The reason I use snaps is because I change baits a lot when I fish, and I don't want to have to retie whenever I change lures. I probably wouldn't want to throw an expensive swimbait with a snap, but that's the only bait I wouldn't use a snap on. I hope this helps. Ben
-
I'd say you hit it dead on. Great work! 8-)
-
Those look awesome! I can't wait to see the finished product. 8-) If you're making these out of wood, I think you'll run into problems with the details. If you seal the bait with epoxy, you definitely won't be able to keep the fine lines shown in the image. But, I don't have much experience sealing with materials other than epoxy, so correct me if I'm wrong. Ben
-
Very, very nice! I love the colors on this one.
-
Those look great! I really like the splatterback. 8-)
-
I don't need a reel that large, but since I'd be getting it to replace my current reel, I want it to be the same size as my old one. I've fished with the same Shakespeare Tiger spinning combo for years; it's big and bulky, but it held up and I caught a lot of fish on it. I've thrown lures that weighed from 1/16 oz. to 4 oz. with it (although both of those are pushing the limit on what it can do). One of the main reasons I bought it was it was large and strong, and I need my gear to last for a long time, and be able to handle any size fish I'm likely to hook. But, it finally broke so I can't use the reel's left-side retrieve, which is the side I normally use. I'm looking for a replacement reel that's the same size so as to keep the rod balanced when I use it. Like I said before, the weight isn't an issue for me; I've been using a 14.5 ounce reel for a long time, and I don't mind the weight. You use what you have, and I have a big, heavy reel. Ben
-
A "kill spot" is a spot (usually black) on the side of the lure. This supposedly gives fish a "target" to home in on because it stands out from the rest of the lure, but it looks cool regardless. The lure below has kill spots on it. There are lots of ways to make kill spots; the kill spots on the lure below were airbrushed on, but you could also use a nail head dipped in paint, or even electrical tape. Hope this helps. Ben
-
Repainted Poe's 400 and a DD22. I tried something I'd never done before on the Poe's; I tried to spray a hairline with my airbrush. I think it came out pretty well for my first try. The rest of that pattern was inspired in part by one of Stringjam's baits on TU. The DD22 is a pretty simple fluorescent orange craw pattern. Thanks for looking. Ben
-
Thanks! The screw eyes on the Poe's baits are the originals (or at least the ones in the lure when I got them). They're about 1.5" long each, and very heavy duty. The screw eye pulling out isn't an issue, but water seepage is. That's the main problem on the lures I'm rebuilding; water seeped in around the bill and/or screw eyes. This caused the wood to swell, which cracks the paint, and when the paint is cracked even more water is allowed to seep into the lure. The only way to completely fix that is to rebuild the lure, and epoxy inside the screw eye holes to prevent any more water seepage. I did that one these lures, so i don't think I'll have any problems.
-
A little background on what I did to the Bagley lure: As you can see in my first post, the original balsa head had broken off and been replaced with some kind of plaster by the previous owner. I ended up cutting off more of the head to get a straight line. Then I epoxied a piece of cedar into the slot I had just cut, and when the epoxy had cured I sanded it to shape. I also had to make a new bill out of lexan to replace the original because the original bill was cracked and severely marred. I used the line tie from the old bill so as to keep the bait as intact as possible. The pic below shows what it looked like after I was done rebuilding it, but before I painted it. Ben
-
Here are the finished lures (the top one is mine). The bottom pic is a sneak peak of a few more I've almost finished. Let me know what you think. Ben
-
I recently received a bunch of old Poe's and other crankbaits. None of them was very fishable, so I've been rebuilding them. These are the first three I've finished: a Poe's 400-P, a Poe's 300 series (I think?), and a Bagley Killer B. I also finished a deep crankbait of my own design that I started a long time ago and only now finished. Anyway, here they are. These are pics of what they looked like before.
-
I'll definitely consider going with the prodigy instead. If it's a better reel, it would be worth the extra money. Thanks! Ben
-
Whoa, I didn't say six feet! That bait only goes down six inches at the deepest when you use the top line tie. There's just no way to get a bait that size with that bill angle to run six feet deep, no matter where you put the line tie.
-
It's not difficult; if you put the hardware in straight there isn't much to adjust. I only had to make tiny adjustments to get both of the line tie's running straight. Now on my earlier baits, I had a ton of problems. That was due in a large part to me not putting the hardware in straight. Now that I've been building baits for a few years I very rarely have a bait that won't run straight. Using PVC has made it easier, because I don't have to contend with the woodgrain while I'm drilling holes.