ernel
Members
-
Joined
-
Last visited
Everything posted by ernel
-
Try adding some reducer to your paint. It sounds like your paint is drying too fast. Eric
-
It depends on how much you want to spend and what types of wood you are going to be using.. I use the band saw, dremel, drill press with vise, air compressor, airbrush, sandpaper, bench vise, various pliers and wire cutters. I use balsa and basswood for now. Eric
-
The one thing I will suggest, is to get the best that you can afford. Can you paint with a cheap brush? Yes. Will a more expensive brush make up for lack of experience? No. It will however make the fullest of your current skill level, and "grow" with you as your talent increases. Don't skimp on the tool that puts a "face" to your lure. Eric
-
SWEEEEET!!!!! I bet I know how you make the eyes. :-X Eric
-
Thanks guys.
-
Nice work.
-
My only advice is to remember that once you change tips, you are in a since using a different brush. All the outer components are the same, but all the internal parts for the fluid flow are different. This being said, you are going to need to make changes to air pressure, needle movement, and paint viscosity. If you are using a siphon feed brush, it will be harder to do any really fine lines. Siphon feeds require more air to move the paint into the brush. Due to the increased airpressure, you can't get as fine of a line as with a gravity feed brush. You may need to look into filtering your paint before spraying if you are using a extremly fine tip. Small dried pigmants that flow through your larger needle and tip will clog in a smaller tip sometimes. This can cause the spitting you described. I use a .30 on my Iwata and only have to filter a few of my cheaper paints and some of my older paints that have started seperating in the bottle. The last thing is to make sure that everything is in good working order. The slightest bend in a needle tip can cause improper paint flow, or having to use more air than is normal. The finer the tip the cleaner it must be and stay in order to work properly. Eric
-
Thanks for the compliments. 8-) Marty I did kinda' go into seclusion. I was still lurking from time to time, just not everyday. I now sit on the bed while dis-assembling or assembling the brush. Eric
-
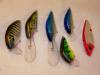
Different veiw:
-
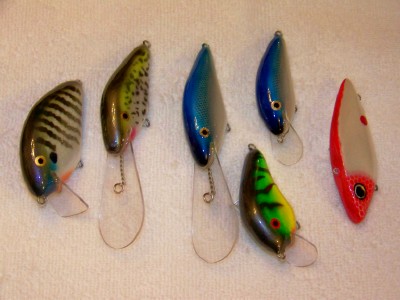
Been out of service for a few due to being a clutz and letting the Iwata land nose first on the counter. None of the protective covers were in place and bent the fluid tip and the interior nozzle as well. No airbrush for close to 2 weeks while it was sent back for repair. Had a serious case of withdrawl and this was the end result. Bluegill Crappie attempt couple Blueback Herring patterns Firetiger Red & White trap for contrast. Eric
-
Very nice work Marty. I like the top two alot. I wish the camara would have shown the flip flop scheme on the third. Eric
-
All my painting is done with an airbrush.
-
Those look great Marty. Ireally like the way the paint scheme flows on the the 24 footer. I know a few places to throw one like that. What pound test are you using when you test dive the cranks?
-
Fine paint scheme. Very nice indeed. 8-)
-
For me, an airbrush is the easiest way to get professional results. You can use spray cans for some paint schemes, but the possabilities are limited due to the size of the spray pattern. As far as paint types, Createx, Apple Barrel, and Delta are what I have now. Eric
-
The "harness" you are refering to is the through wire method that Munkin rerefered to. You can also use a basswood balsa laminate that will hold a homemade hook hanger made from a piece of stainless that is twisted into shape. The basswood acts as the "spine" so to speak. Eric
-
Nice work Marty. Are you sure you have a day job? ;D
-
Oh yeah, heat setting. That is how you get your paint to "set" or become locked onto the surface. I use a hairdryer. Sorry for the poor explanation, but that is the only way I can explain it. Eric
-
The first coat of clear helps the scale pattern look a little deeper. The 2nd will hold that pattern if I make a mistake. The 3 near the end give depth once again and a little seperation between the colored paint and the pearl mix. The pearls are mixed in a clear coat that suspends the flakes away from the body. The final 2 coats just make sure the pearl powder is covered prior to top coat. Overkill? Maybe, but it works out well in the end. Eric
-
Try mixing up a batch on aluminum foil to see if you get the same result. It may be reacting with the Dixie cup. Eric
-
Thanks folks. All the compliments are apprieciated. As far as selling, it will eventually have a price tag. Right now it is still a prototype that needs tweaking to meet my specs. I just painted it to keep in pratice. Keep looking for the final addition to come sometime around mid March if everything works out. I struggled a little before posting this part. The paint scheme is the one thing I normally hold sacred, but here it is: The color recipe is fairly straght forward. White base pearl sides goose feather upper Clear scaled od green with touch of pearl white mixed in faded from top down heat set very well, then wipe very lightly with wet lint free paper towel. Do not remove all color. Heat set again. (Scales should fade slightly as lure is shifted) Clear whirled pea green (for lack of better name) with leaf green and tinting black for bars dark od for shoulders and upper back black mixed with metalic silver sprayed on center of back and nose caribean blue for bluegill accent 3 X clear mix pearl powders with gloss clear (Lilac, and Galaxy blue Sprayed seperatly) Clear X 2 Topcoat It took roughly 2 hours of trial and error to get to the final color product. I will be making more changes to it as well. There are a few shades that need to be re-mixed. They just aren't pleasing or mixing correctly to me. (Hard to explain) Eric
-
Flechero pretty much nailed it. Go to wally world and pick up a new tube. Test it prior to use if you doubt the label. Eric
-
Some of the pearls that I mix myself require around 28 - 30 psi. Most everything else I spray from 18 - 22 psi. My Iwata has an air control on the brush, so some pressures are lower leaving the brush than what is supplied by the compressor however.
-
Mine are stencil. I pick up my stencil material at Wal-Mart in the craft section. You can use cardboard, milk jugs. or any other material that is firm enough to hold up to being sprayed. I prefer something I can see through before spraying.
-