

islandbass
Super User
-
Joined
-
Last visited
Everything posted by islandbass
-
Is it private? It couldn’t hurt to inform the owner. If the state runs perhaps you should let them know. If it isn’t supposed to be in there, they’ll probably give you the green light to target it.
-
I knew gators were big but dang! Hope you post a report or two.
-
Nope. Me too, lol. Whispering the word, “Sizzzlerr.....” make sure you protect yourself from the heat. There is one one left in the Seattle area.
-
Always offer a lower price than given. That’s how you can tell real garage sale goers from the amateurs. Also, perhaps more often than not, lots of fishing gear is being sold by people who don’t know the value of what they’re selling unless they are anglers themselves, lol. Thoroughly check the gear. That just about it.
-
I think you got your buddy on this one. I don’t see fish going out of their way to swim upstream unless they really have to. Sure there could be exceptions, but I think spot on.
-
Checks are in the mail ?
-
Go with what you know is comfortable. When you’re pitching though, there really is going to be anything in nature that’s going to get in the way of a pitching cast. I am curious and would like to ask what in the mechanics is feeling uncomfortable. Height shouldn’t be an issue since I’m 5’5” and pitch both 7’ spinning and casting rods. If it is a feel thing, I understand. A 7’ rod definitely doesn’t feel like a 6’ or 6’6” light saber of a rod. I am also a shorebound angler.
-
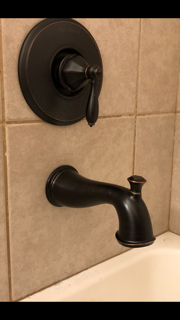
First, I want to say thanks to everyone who helped me. I found out that the adapter did not have a stop in it as I initially thought. I found this out when I inserted a clean piece of pipe through the adapter and it shocked me that it went through! Then I went back to the pipe in the wall and wondered why it wouldn’t go through it. Well, closer inspection of the pipe showed that there was an ever so slim layer of solder barely visible and that was enough to prevent the adapter from sliding through completely. Fortunately, the pipe extending from the wall was exactly 3.5” and according the installation instructions, that was the max length. This meant that I didn’t have to cut the pipe. I was relieved. I marked the spot on the spout pipe and then applied flux to the appropriate places. Then inserted the adapter and lit the torch. It took me three tries. The first two times was frustrating because I didn’t know why the solder was not flowing in but instead just getting soft when touching the pipe and then breaking off. To make a long story short, I realized it simply was not hot enough. The third time is the charm. It was cool watching the solder melting fully and get sucked in, as if it were magic. I managed to save $$ on a plumber in exchange for learning a new skill. It might be more accurate to say I diverted that money to feeding the tool monkey vs. saving $$, lol.
-
That is me, if and only if I know I don’t have my cell phone on me. If you notice, his action was instinctual and driven without a waste in thought or of time. I did a similar thing to save the top half of a two piece rod in a freezing river in winter. Yes, the ice water felt like a million nails piercing me on every point of my body simultaneously but I did save my rod tip and a bunch of money by switching to Geico, lol (True story).
-
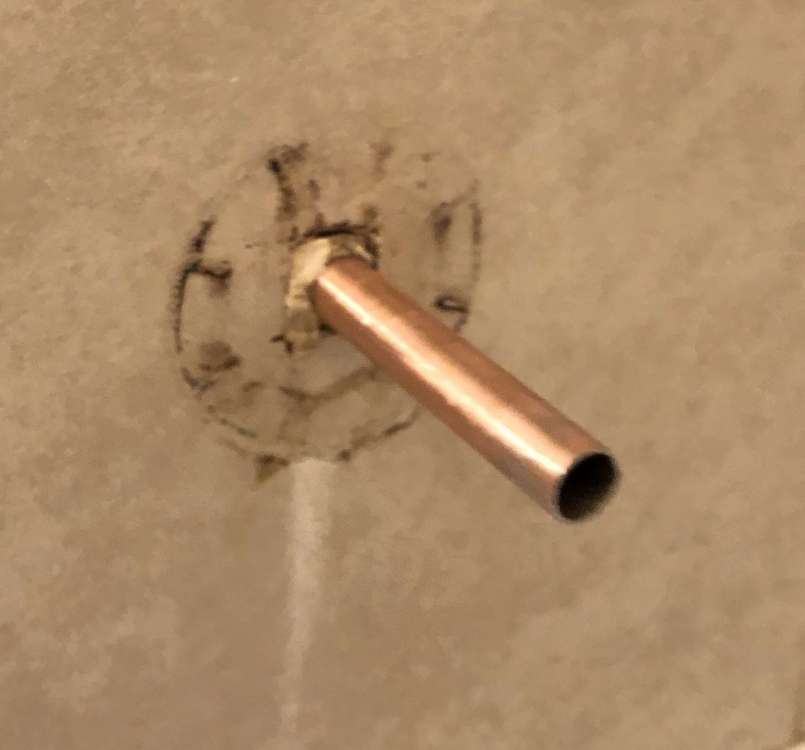
@Jigfishn10: Built in 1996/97. I inspected the delta spout to see if I could screw it on like the Pfister spout, and the plastic thing inside doesn’t want to readily come out as I hoped it would and I wasn’t going to over mess with it to try to remove it. I also learned that the delta adapter has a some kind of stop inside it so the pipe will not going to go through it all the way which is why I now have to cut the pipe to size which I really didn’t want to do. I removed the end piece with the torch to get a feel for using the torch and got the pipe cleaned up entirely for practice with some some light grit sand paper that I thought was an emery cloth that came with kit I bought. I will clean the pipe’s interior after I cut it to size. I work my graveyard job tonight and over the weekend so I won’t get to this until Saturday afternoon. Even old guys like me need to rest after an 8 hour warehouse job to be 100%, lol. Thanks!
-
@Jigfishn10: You definitely called it on needing to cut the pipe. I was looking at delta spout installation videos and their adapter demands use of pipe quite short. and it looks like I’m going to have to cut it pretty short. The tool monkey made made me get a torch, pipe cutter and all the things like flux and solder. I bought a small bit of copper pipe to practice cutting since I’ve never done it before and it seems I’m only going to get one good chance. I still can’t believe how short the delta adapter requires the pipe to be. If my wife switches to another brand that demands a longer pipe to install the spout, it’s going be a no go, or more accurately, no go but have to go, lol. The next step is to practice soldering. I will be practice with the pipe I bought and a few couplings. While it isn’t the exact same procedure, it should be similar enough for practical purposes.
-
@Jigfishn10: Yes, it had a diverter. The spout is probably the only thing I have to really replace but I’ll probably replace the showerhead on the Mrs’ orders too. As for probably needing to cut it anyway, the thought crossed my mind. However, I will know for sure after I get that threaded part off. Thanks for the advice on everything.
-
Thanks, deaknh03. I honestly wouldn’t have thought to do that.
-
Thanks, MN and Jifshin 10! I really appreciate all of your advice. I will take my time when I attempt to remove that threaded nut thingy. Now it's off to amazon!
-
Thanks, 12poundbass. The instructions assume that the copper pipe is not threaded. As someone who is not a plumber, I was thrown off when the instructions said to use flux. I had no idea what the heck the instructions was talking about. You tube to the rescue. A couple videos showed basic copper pipe soldering including removing a soldered adapter. That is the only thing that got me to think that that threaded end piece was soldered onto the end of the pipe. If I didn’t watch that video I would have thought I would have to cut it off. Doing my research on a torch. I’ll also need to learn how to solder now. ?
-
I see I kind of missed the part about being the quickest way. That would have to be having a “ready to go” spare reel. No ifs ands or buts. My recommendation cannot beat a spare reel. With that said, I know I can respool a reel in 5-7 minutes including tying the joining knot. And that is better than spending twenty minutes trying to undo a birds nest and risking fishing with damaged line. You didn’t mention how many rigs you normally bring. I usually don’t carry more than 4 rigs, usually two casting and two spinning. I usually don’t carry spare spools for the spinning reels. This is probably why carrying filler spools will work for me. So in your case, and not know how many spare rigs you were planning to carry, perhaps the compromise for you if you didn’t have the spares Would be to bring the 1-2 spools for your lines on rigs most likely to birds nest (eg, rigs for lighter or less aerodynamic lures like spinnerbaits on a windy day) or for the rigs you use the most.
-
The cheapest solution is to never ever backlash. No spare is needed then, lol. Funny that I’ve thought about this before in the past but concluded that it is better to have a spare reel. Why? From my own experience, any major nest I achieved that was so difficult to undo was so fluffed out that there was no way to get the spool out without cutting off the line anyway. But as you noted, it really doesn’t make sense the have a spare spool for every reel. So for me, spare spools are out of the question. Not practical in the field. Lugging around spare reels isn’t so hot either. As a bank angler, I try to minimize what I carry and extra reels that probably will never ever get used is unnecessary weight to bear. So what is my solution? I bring the line I want to replace. That way, I have exactly what I want. Zero compromise. Trust me, it is far easier and faster to cut off enough of the damaged line and either start completely fresh (rare for me) or attach the remaining line on the spool to the line on the filler spool. One filler spool could probably fill your reel twice over (except full braid probably) which gives you two get out of bird’s nest jail free cards. Dilemna solved.
-
I don’t know if going to an ML is going to be of much use to you with a T-rigged bait save for lighter wire versions. You should get one however if only for the sake of expanding your arsenal and delving deeper in to the truly finesse world. There is a place for this in bass fishing. One of the things about the finesse type of drop shotting since it isn’t limited solely to finesse fishing, is the typical drop shot hook has enough similarity to the “no need to set the hook” circle hooks. Yes, there is a hook set involved, but it is more or less reeling up the line to get rid of the slack and add a little tension to said line and that’s usually enough to make the rod tip bend for the “hook set.” The drop shot hook type (gammies and owner mosquitos) practically set make the fish set the hook on themselves. If your daring enough to go lighter in power to ML then the benefits of getting a higher end rod should be a significant step up in sensitivity and better components. And of course, never ever being able to go backward quality wise, is the downside of the dark side, lol. I think I see your bait monkey behind you.
-
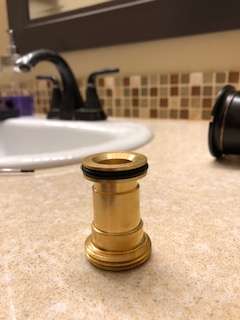
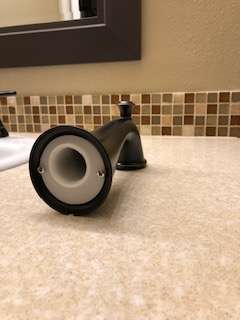
First update. I got the spout off! I did some research about basic spout installation but it appears that it is not as straightforward as I hoped. The copper pipe is threaded at the end and none of the installation examples covered this case. a close up The old spout was screwed onto the pipe by those threads. The new delta spout (below) has a plastic thing with threads which is probably typical. It also came with an adapter. The adapter will not fit over the threads because of that nut head thing of a jig at right behind the threads. So here is my educated guess. The nut looking head appears to be soldered onto the copper pipe which hopefully means that I should be able to remove it with some heat from a torch. I think this because there is a silvery line underneath going all the way around. If I can remove it, then I should be able to slide that adapter piece onto the pipe. The adapter does not have a set screw so I think it will need to be soldered on. I am tempted to find a version of this adapter with a set screw, but it must have come this way for a reason, lol. I’d like to know if anyone can tell me if I am on the right track or way off. Perhaps I should cutoff that threaded area if it isn’t soldered on? Also, if I am on the right track I now have an excuse to buy a torch. Can anyone recommend one that is affordable and get the job done? I’m thinking along Home Depot/Harbor Freight lines. Thanks, guys. The sooner I can get this done, the happier the wife will be and the sooner I can get back to doing what we all love ?.


-
Power: Medium Heavy Action: Fast Length: Anywhere between 6'6" to 7'3" (I'd go with 7') As already mentioned compromises are made the closer you move toward finesse and the other end, heavy jigs and swimbaits. I don't get into companies however. Dodge, Ford? Whateva, I'm stuck with a rice rocket, lol. PS I am of Asian/Pac. Island heritage, so there shouldn't be anything racist in my last sentence.
-
“Ahh, I see,” said the blind mouse. Thanks.
-
Thanks,MN. I’m probably going to get a chance to delve into this on Tuesday. I’ll keep you all posted. ?
-
Thanks. That did appear to be the case. Now if I know anything about my wife, she is going to probably want to have the Pfister faucet and shower head replaced with their new Delta counterparts. Is is there a way for me to know if the faucets and shower heads are a simple swap out? Working 7 days a week, I can’t afford to encounter snafus so I’ll take a day of in case I need the extra time, lol. Thanks again, 12poundbass.
-
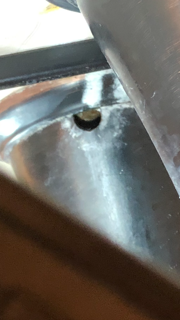
Hey guys, I have to replace a price Pfister bathtub spout. The thing is that after I found the hole underneath the spout, I inserted various hex wrenches but could find anything to latch onto. So I thought, maybe it’s a screw driver that’s needed. Same result. I was wondering how in the heck am I supposed to look up into that hole. I finally figured a mirror and bright light might do the trick and I think it might have. It seems that the spout is actually attached directly to the copper pipe and that there is no inserted object as I have seen in typical YouTube videos. So to the plumbers out there, are spouts ever directly attached to the copper pipe? If so, what is the safest way to remove the spout? I was thinking to take some pliers and turn the spout ccw but I admit I don’t know and don’t want to rely if ignorance and an educated guess. If I can reduce the size of the picture, I’ll post it here to show that it appears that the spout is attached directly to the copper pipe. Also, this is a price Pfister single faucet and spout. My wife bought a delta set up. I opened the box and was dumbstruck. I see this piece that will attach to pipes behind the wall. Do I have to replace the one in the wall already in place with the delta one or is this a universal piece that could be used with the new delta spout? i haven’t even gotten around to knowing how to replace the faucet or the shower head. If if I can get away with just replacing the Pfister spout with the delta spout I might be a happy camper until I figure out the rest else the kids have to continue using our shower, lol. This is is a shot of a reflection of the hole underneath the spout. That brownish spot that is in the light bordering the black moon shaped shadow is what I think is the copper pipe. So exactly how are the copper pipe and the spout attached to each other and how do I safely remove the spout without damaging the copper pipe? Thanks ahead of time. -ib
-
So true! That is often overlooked! We check our knots and rod guides but not many check that.