
FuzzyGrub
Members
-
Joined
-
Last visited
Everything posted by FuzzyGrub
-
Like the experts have indicated, it sounds like you are getting way too much paint on the jig. I posted some info here after my 1st experience. Without a fluid bed, fluff after each jig, a quick swish, and tap off excess. http://www.bassresource.com/bass_fishing_forums/YaBB.pl?num=1262097875/13#13
-
I glued the copies to the bottom and poured the resin. They came out better than the water cured silicone I tried. The RTV like was posted, is better, but I haven't used it yet.
-
I started doing some of this last winter. You can spend $100 with no problem. Flat pour molds are relatively inexpensive, but may not produce a bait that will be production looking. It takes a bit of practice to not over or under fill. And then you still have a flat side. A 2-piece pour or injection mold gets you to a more production looking bait. The latter being the best. You can probably sink $100 into a 4 bait senko mold plus injector. Del-mart may have a starter kit on this. Myself, I am still playing with flat pours and making my own molds. I recycle allot of plastic from the fishing season. //joefish.homestead.com/SoftPlastics.html
-
Nice set-up, and another thumbs up on the drying wheel.
-
From the SuskyDude neighborhood.
-
FWIW: The person that made these was experiencing that issue. They were smallie fishing in rivers where good size pike and muskie lurk, and had apparently lost a few blades. Even though I fish similiar water, never had it happen. It is definitly a stronger, more perminent, connection, and only down-side I see would be a slight increase of debre it might catch.
-
BTW, that is not my handywork. I just grabbed the picture because it was easy and clearly shows what I wouldn't be able to describe. I had seen it used and seemed like a much better way to accomplish what you were trying to do. From the maker of that bait: "Round bend pliers and two sets of needlenose pliers. One holds the loop and the other wraps the tag end of the wire around the shaft. Like anything else, it becomes easy with practice." For myself, after I loose my first blade and swivel, will learn how to do this very quickly.
-
If you want extra strength, consider doing it like this: (I would chose that over epoxy or solder)
-
You bet it will!! If you Modify the rod by splitting the grip you are still eligible to use the Gold Star Warranty program. Even if the modifications are at fault of the rod breakage. And if the rod breaks nowhere near your modifications, I'd bet it would still be covered by the original warrantee. I have had similiar discussions with St Croix rep, but not specific to a split grip mod. If you are worried, call and discuss it with them.
-
Nice jig, GMAN. Keep the pictures coming.
-
The gold ones were defects, missing one of the internal weights.
-
48 degree water:
-
I have used the 100 size. They suspend in the lower 40 degree water where the LC suspend in the upper 40's. The springers sink in the high forties. Had a couple with a missing weight/rattle and they floated. I consider them "expendable" pointers.
-
Great Stuff! 8-)
-
I started this winter as well, but also did the powder painting. Here are some links to basic stuff to get you started: http://www.youtube.com/watch?v=48luv7rPjYo '> http://www.youtube.com/watch?v=48luv7rPjYo http://www.fishingskirts.com/ http://www.barlowstackle.com/Lunker-skirt-tool.htm '> http://www.barlowstackle.com/Lunker-skirt-tool.htm http://www.barlowstackle.com/make-your-own-umbrella-spider-jigs.htm '> http://www.barlowstackle.com/make-your-own-umbrella-spider-jigs.htm http://www.barlowstackle.com/make-spinner-bait-skirts.html '> http://www.barlowstackle.com/make-spinner-bait-skirts.html I use the rubber collar to make the skirt, but then fasten it to the jig with enameled copper wire, and remove rubber collar. I plan to try some heavy thread, next.
-
It suspends the powder paint with air. Keeps it constantly stirred, and provides a more even coat. I just made one based on plans provided by Cadman and similiar to: '>http://www.ohiogamefishing.com/community/showthread.php?t=65633 I used vacuum cleaner bag for medium and has worked well for GP, Black, and Brown, so far.
-
You don't want braided wire. It is too flexible and does not retain a bend. You want solid core enameled magnet wire. 20ga as mentioned above or something close. If you are trying to recycle, a medium size electric motor may have the right gauge size. I opened a broken washing machine motor and a microwave blower motor. The latter had too small a diameter, and the former a little too large.
-
Looking good! 8-)
-
$300, The skirts were purchased from a few different places. My first batch came from Jann's Netcraft, picked up some more with an order from Susquehanna Fishing Tackle, and others from a forum member. The different color choices can get addicting. All the skirts are 20 strand and appear near the same. I have some Living Image multi-color but have tended to prefer more solid colors and mix the colors myself. The jigs in the pictures are a bit over endowed. They have 3 or 3 1/2 tabs per jig. I have weened down to 2 - 2 1/2. I didn't pour my own lead. I purchased most of the unpainted jigs from North Star Baits. They were having a 25% off Black Friday sale. I did opt to have the weed guards not attached. I didn't try prefitting the weed guards before painting, put suspect that there were some that the lead was not perfect. Between that, but mainly the paint, I used a drill bit chaser and prefitted before epoxy. Many required removing 3-4 strands to fit the hole. No problem, because there is more than enough strands to get the job done. Devcon 2 ton held fine after a night of cure time. I didn't have any issue pushing the skirts up the jig using a slight back and forth motion while pushing up the jig. I had to be a little careful not to roll the rubber collar. I did paint all the way to the hook shank, though. Also, the largest jigs I have done have only been 1/2oz. Probably depends allot on the particular jig mold/design you have. I only pushed the skirt collar on to the trailer part of the jig. I then used copper enamel wire to tie and hold the skirts to the jig. I then removed the rubber collar. The copper wire can be drawn down a little more than the rubber collar allows, and gets slightly more "fluff" to the inner strands. I could also squeeze a rattle strap behind it. I had read that somewhere, and from my own testing found it to be true. I hope this newbie info can help.
-
Thanks for the comments. I am happy with how these turned out. It probably means a more lasting addiction, though!
-
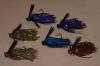
A few skirts I made and put on today.
-
Great work! 8-) What does it take to become a relative? My son would love to have the "sox" version. He could hang it from his "World Series" cap.
-
Pics of solid color bare jig heads are very boring. I am now playing with different skirt tab color combinations, number of tabs, and attaching methods. I will post some pics of final product.
-
Thanks for adverting a "dumb" idea before it is tried. Not even sure how much I will dable in two-tones, anyway.
-
Cadman, I read many of your posts here and at TU. Thanks for all you have shared with everyone.
