Way2slow
Super User
-
Joined
-
Last visited
Everything posted by Way2slow
-
Don't worry, I think a whole lot of people have never even heard of a banana sandwich, much less with PB or PB&J. I think that's another one of those southern things. Kind of like grits for breakfast. Breakfast ain't breakfast without grits.
-
Well if you are game here's the rest of the story. I reduced them down more and made better images so hopefully they work. Where he solved for Z2 and Z5 at the bottom of page 58 is where I'm lost and can't find how it came up with those figures, and those are the starting blocks for the whole configuration.


-
A temporary cure for that is to retire. I say temporary because if you are like me, once I got used to having all that time, I started finding more things to do. Now I'm back to being busier than I was before I retired.
-
I like PB&J sandwiches, had one for lunch yesterday and today. I do not like the two stirred together, my wife has always done that for the kids and grandkids, and tried it a couple of times on me. Totally changes the flavor. I like to be able to taste the peanut butter and the jelly, not what you get when you blend the two together and the ratio has to be just right. not too much or too little of either one. I agree with the Smuckers Concord Grape, that's the only one I use on mine. Peanut butter on one slice, jelly on the other. However, you think what you do is weird, ain't nothing compared to mine. I also like to put a banana in mine. Of course I also eat a banana sandwich peanut butter and mayo, those are good also. I also make peanut butter and Grape jelly saltine crackers sometimes for a TV snack.
-
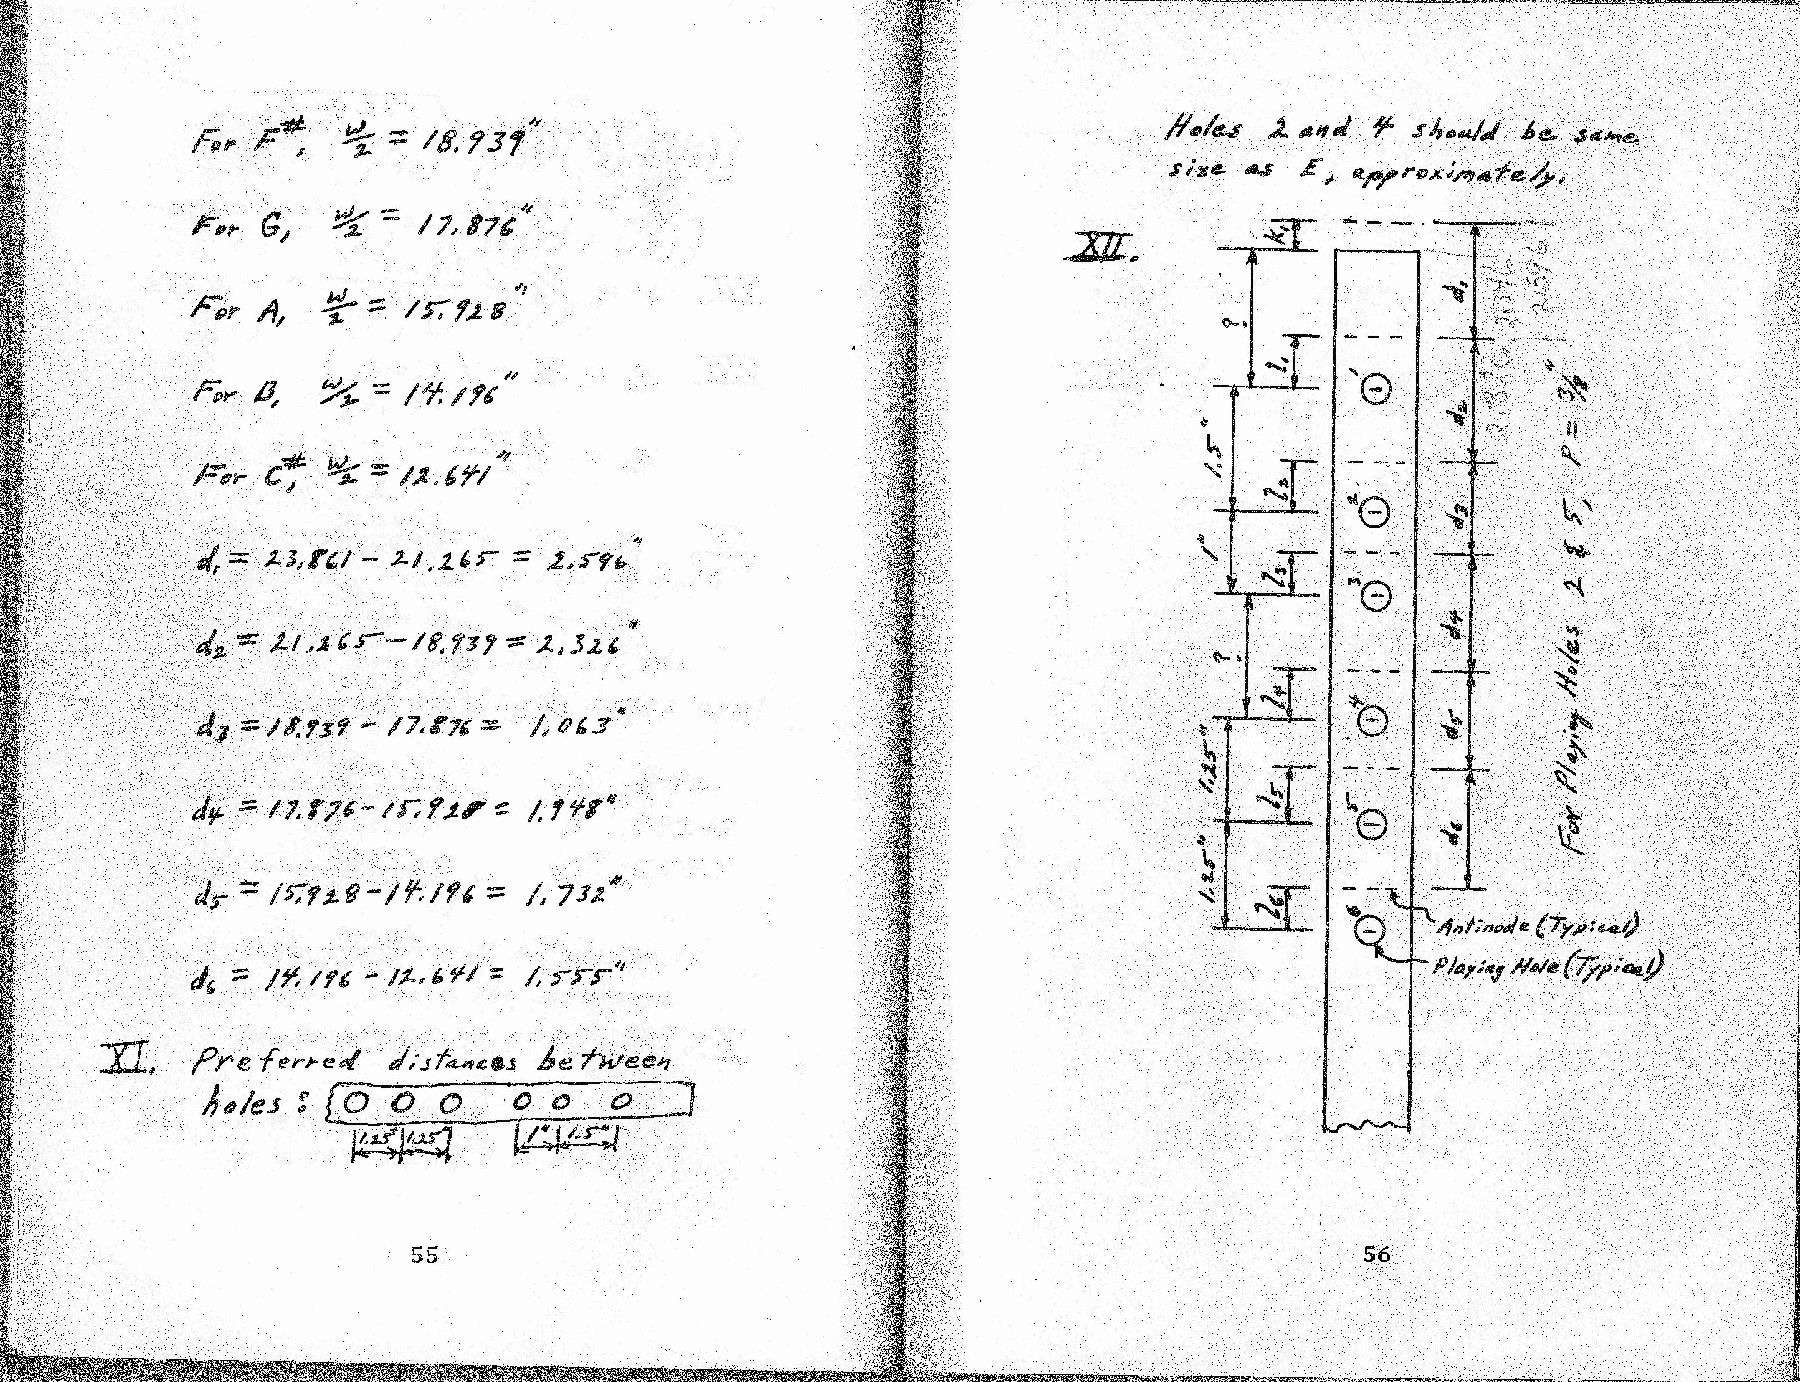
OK. that symbol you say looks like and l, is actually his own symbol to represent the distance from the antinode to the center of the playing hole. For a while that I thought it was the "!" for a factorial and that was really confusing me. I finally came to the conclusion it's just the sorry printing and it's that very elongated Z (kinda like a lazy Z) with curved ends looking symbol he uses for part of the hole placement measurement. At least that's what I'm hoping it is because if it's a factorial symbol, I'm totally screwed. I first said I would use the capitol S but the Z is more along the lines of how it's shaped. For the R, No where in the book does he give a meaning for capital R other than above that equation where he is talking about the radius "r" for the volume of air moving tangentially. I think the guy was some sort of aeronautical engineer or something and he goes through pages of formulas where he keeps breaking them down into "simpler" versions and explaining each along the way. You spend 20 minutes working a formula, just to learn that's not the one you will use because he breaks it down even more in another section. I think he's just showing how he came up with the formula at the bottom of page 35 for (1+D/4) in the formula (D/2) squared times Pi, divided by (Z+d) (1+D/4). Note: I will us the capital "Z" to represent that funny shaped symbol of his own you will see a lot of, that is not a 1 or l in the equations. That one measurement is the one creating all my heartburn. The "Z" is the distance from center of playing hole to antinode. the "d" is the difference in frequency wavelength between the sound hole (finger hole) being open vs closed. The sound wave produces what's called a node and an antinode. The node is at the center of the wave and the antinode is at the end of the wave. If a finger hole is in either of these two locations, bad things happen to the sound. Everything is adjustable and you can play with the numbers, hole size and spacing between holes, etc. but you have to be able to calculate the antinode "Z" . At the bottom of page 58 he shows he solved for Z2=1.171" and Z5=1.097". Those two holes he say need to be 1/2 the bore diameter so he used the known 3/8" (.375). Once you get one, you can solve for the rest but I can't figure out how he got those. I made a photo scan of this page and used my photo editor to see if it show up better so you can see better what things are. One note: the top of the page says 2 & 4 should be the size of E, but then it shows 2 & 5 else where. Anyway, "E" is the width of the true sound hole "TSH" which should be 1/2 the bore diameter. Keep on, I'm gonna have you making a flute. Also, the K1 at the end of the flute. That is a false length that's figure for the sound wave as it exits the end of the flute, which in this case is .25". Now, if you are still game, I can try to scan the other pages as a photo's and see if they are more readable.

-
This is the initial equation but there are two more pages with the supporting info. If you think you can help, I will post the other two pages or email all four. I suspect and email copy would be larger and more readable, but I figured I would let you see what's involved first. You might want to recant your offer after seeing what's involved. What this is, is called the bore extension and is needed for placement of the playing holes. This is an unknown until you solve for it. The playing hole sizes are also unknowns but hole two and hole five need to be at least 50% of the bore diameter of 3/4" or .75". So that gives the size of hole 2 and hole 5 of 3/8" or .375". Using those a knowns, you are supposed to be able to figure out S2 and S5 from that. You have to be able to come up with one of the S sizes to make the calculations for the other holes. Once you have one, then you can solve for the others but I can't figure out how he solved for those first ones in 2 and 5.

-
OK, I'm going to try posting the pages here. There are three more pages need to make this one make since but this is a sample of where I'm at. At the bottom of page 58 you will see the line: Solving for S2 and S5 and the figures S2= 1.171 and S5=1.097. (That's not really S but the S is the closet thing on the keyboard to match the symbol he uses). I can't for the life of me figure out where he came up with those figures. The site limits the size of inserts so I will have to make each page a separate reply, I can't get two pages in the same reply. This is also not a real clear book so this is the best I can do for a copy. I will post one more page with a little background on the equation.

-
I have some algebra that's not making a lot of since to me and it has been over 45 years since I've had to do much algebra. That was when I got my EE degree. I'm learning how to make Native American Style Flutes and there is a section in one of the books I'm studying on how to figure playing hole size and placement that's kinda kicking my butt. I will probably have to make a copy of the pages and email them because I don't know how in the heck I could explain it on here.
-
The stator does several things, charging the battery is only part of it and those coils are separate. There are two other coils in the stator that provide the initial exciter voltage to the power pack. Depending on the model, there is also a coil for the quick start function. So, it's possible to fry the charging coils on the stator and not do anything to those others. It's also possible for the others to fail and not do anything to the charging system. However, the coils are usually not replaceable independently, so not matter which fails, you have to buy the whole stator. Usually if the charging coils on the stator are fried, it's very visible. They are usually a deep red, copper color, and turn black and burnt looking when over heated. If you decide you need to look at the stator, the nut is held on with about 130# of torque. A harmonic balance puller will usually bolt onto the flywheel and break it loose, (as long as it's a good one and not one of those Harbor Freight one). Just be careful with the bolt length you use, too long and they can going through the flywheel and into parts under it you really don't want to screw up. You should not have to pull the flywheel just to trouble shoot the problem though.
-
Don't mind doing it as long as the person seems to appreciate it. It's those that make a post asking for help and never respond back that bothers me. I would like to advise people about doing something the OP said he did in his first post that is a big NO, NO, even with your automobiles. Never disconnect or connect the battery cable with the key switch and especially with the engine running. That can create and arc of several hundreds volts and can blow the rectifier/regulator in a cars alternator or in a boat motors charging system. It can also damage the CPU/ECM/Power Pack in the car or boat motor. That's an old timers test people did with cars that had generators and people would do that to see if the motor would stay running. That was considered a quick check to see if the generator was charging or not. Generators didn't run the solid state devices the modern charging systems run so it didn't bother them. When they went to alternators with sold state rectifiers and regulators, that is not a very smart test. Plus, an alternator has to have the exciter voltage to work and when you disconnect the battery, you can take away the exciter voltage, so that may not work anyway. Using a voltmeter is the best and safest way to see if you charging system is working. Also, OMC outboards run a CDI ignition system, so they don't need a battery to run. The battery is only needed to spin the starter. If you had a way to spin the motor over, you don't even need a battery connected to it to run. Once it is running, the only way you can shut it down is cutting off the air or fuel supply, pulling off plug wires or grounding out the ignition system (which is what the key switch does). The key switch opens and closes a ground in the power pack through a black/yellow wire. If that black/yellow wire is not grounded it does not shut off, and if it is grounded, it's not starting.
-
Sounds like your motor is about to get a little more expensive. Tach not working, the signal for the tach comes from the rectifier/regulator. Not charging battery, that's controlled by the rectifier/regulator. However, before jumping in and saying the rectifier/regulator is your problem, the stator supplies the voltage to the rectifier/regulator so you have to verify stator is doing it's job, before replacing the rec/reg. Neither of these are parts you just want to jump up and buy without trouble shooting both. Plus it possible both might be bad. Then you will cry. Also, if you have to take it to the shop for troubleshooting and repair, you are really going to cry. You will see what I'm talking about when you start checking prices and availability. If you motor has power tilt and trim, most likely the part number for the rec/reg is 0395391. You need to check the stator voltage going into it first. The main causes of them failing is running a bad battery, jumping the motor off with jump cables or connecting the battery cable with the switch on. OMC's do not run a very robust charging system so when running a weak/bad battery, the charging system has to work overtime to try and charge it, causing it to overheat and fail. NEVER think the charging will charge a weak battery, and if battery condition is questionable, replace it. That's a lot cheaper than replacing the parts it damages. I guess I could be a nice guy and say if you want to haul it a 100 miles to 25 miles southeast of Macon, I could check it for you, seeing how you live in Fayetteville and really get stuck trying to troubleshoot it yourself.
-
As JFrancho said, can be a number of problems. 1st I would do a synchronization on the carbs and linkage. Someone may have tried to adjust the idle and did it wrong. A lot of people will try to adjust the stop bolt on the linkage where it hits the block. Wrong place. Idle is adjusted with the timing knob on top of the block but only have all the timing marks on the linkage and the carb butterflies are synchronized. Also, make sure the cam roller is in tack that opens the carbs. It should be about 3/8" in diameter and have a clear looking cover. If it's 1/4" in diameter and black, it's missing the outer shell and needs to be replace, that throws the synchronization off. 2nd, if the low speed jets are adjustable, open each one, one turn and see how it does. Again, some one may have tried to adjust them and you can't do that on a hose. The motor has to be sitting at normal depth in the lake and trimmed verticle with the water so carbs are sitting level. If it's giving you a lean cough/spit, it's definitely too lean. Two strokes have to be run just a touch on the rich side on idle. 3rd, if the carbs are not adjustable, they need to be removed and give a proper cleaning and float levels set. Low speed jets might be clogged. By the way, high speed jets have nothing to do with it starting off and getting on plane. 4th, You need to do a leak down or compression check. Low compression will cause it to boog. There are a few other things also, but unless you have the knowledge and test equipment, it would be useless for me to start listing everything.
-
Guru, not so sure about that, but I do have a little experience with them. As for performance factor, that's not really a high performance motor, more like your old chevy grocery getter. It's basically the older 135 crossflow that was detuned for low octane gas and rated at 110hp. 5500 rpm is max for it, between 5,700 and 6,000 rpm it develops harmonics that can cause the crankshaft to break. They are prone to ring wear and breakage it they run on cheap, low grade oils and are not kept decarbed. That should have been a standard routine about every 50 hours for the older motors before the days of the synthetics. Now, don't let those couple of comments scare you, there are umpteen thousands of those motors still running great with only minor, routine maintenance through the years. Just make sure you put a little (actually a lot) of extra gas in the tank, you're going to be surprised how fast that motor can go though it', and being new to you, you are going to be running a lot until the new to you wears off. They put GT decals on some of them for a reason, to let you know it's Gas Thirsty.
-
A lot of people are running that battery, they just don't know it. The Duracell is an East Penn battery, Which is also the Deka, Bass Pro shop and a number of other different brands. East Penn makes batteries under a number of different labels.
-
Most likely what you are seeing is the exhaust drainage you get almost any time you run one on a hose. It will be a black, oily looking streak but has more black carbon in it than oil. Totally normal and nothing to worry about. You can leave the top plug in the gear case and take the bottom plug out just enough to let a few drops of oil leak out ands see make sure it's all oil and no water come out with it. When running down the lake, it's being pulled out through the prop so you don't see it, but on the hose, some leaks down inside the housing and down the skeg. Tighten the bottom plug back in the hole and then take the top plug out. If a small amount of oil doesn't come out, use something flexible like a tie wrap to stick on the hole and see how far down it has to go to touch the oil. Shouldn't be more than a 1/4" or so.
-
Looks like another of those one post wonders.
-
Getting out of routine is a sure bet on a problem. Several years ago, I was going to meet a friend at a camp ground on the lake, this is a 77,000 acre lake. So, I had just come in from fishing when he called and it was 13 miles by water and close to 50 by highway, and the ramp was only five miles. In a hurry, I just jumped back in the truck, dropped the boat in the water and was there in no time. Visited about an hour, and then back to the ramp. When I pulled the boat out, I went back to take the drain plug out, just to find I had never put it in. Where it sat at his camp site was about 40 feet deep and I was not paying attention to the boat. My saving grace was the drain plug is one of the screw in kind and on a tether through the hole. The tether kept in in the hole and the water pressure must have kept it pushed up against it so it didn't get much water in the boat. Which on the drive back to the ramp it would have pulled any water out so I'm not sure how much, if any actually got in the boat while sitting at the camp site. Had it not been for the tether, I'm sure the boat would have been at the bottom in about 40'.
-
Possibly the key switch, neutral safety switch in control box, or start solenoid, or starter. Take a voltage reading on the key switch side of the Starter solenoid on the engine, and see if it's getting 12V when you try to start it. If it has 12V when going to start position, then check the opposite small terminal and make sure it's not reading 12V also, that should be the battery negative (ground) side and has little or no voltage in start. If it has 12V also, that means it has lost ground and you need to find out why. If the solenoid is getting 12V in start position, it should be clicking when you try it. If it is, then check the large terminal going to the starter, it should have 12V going to it when the solenoid is energized. If there is not 12V going to starter, the solenoid is bad, it there is 12v to starter, then you have a starter problem. Possibly stuck brush. If you don't have 12V going to small solenoid wire when in start mode, then you need to check you neutral safety switch in the shifter or the wire between the two. This may require opening the shift control unit, so be careful that pieces don't fall out and you don't know where they came from. Also, while in there make sure the ignition switch is sending the 12V to the neutral safety switch before assuming it's bad.
-
The only portable "fish finder" I know of is a lure on the end of a piece of line. For LCD's, sonars or depth finders, unless you find a clearance mark down, it's going to be hard to find a good one for under $200, Several companies make their 4 and 5 inch models that work very well but for all the features that really make a good sonar, they are going to be more than your budget So, with all that, just buy the best Color model you can afford. The biggest thing is learning how to read and understand what you are looking at. In the hands of the right person, the old flashers made great sonars. OOOpps, I see your budget is $300, for that you can get a pretty good 4 or 5 model. Also, keep an eye out for last years clearance models. They can be picked up for great deals if you are patient. And don't forget to check out the Garmin's, they are making some pretty nice units now.
-
Make yourself some checklist, even if it's just mental, and follow the same routine every time every time. Every time you connect the vehicle to the boat. Motor trimmed up and locked in place Tires have recommend air pressure Tung latch has safety pin in Safety chains properly connected to vehicle Tung jack properly secured out of the way Trailer lights connected and all lights working properly, including brake and turn signal Tiedown straps properly securing the boat to the trailer Now would be a good time to put the drain plug in if your state allows it. Do a visual inspection of boat and trailer to make sure nothing is where it can come off or blow out, and all required safety equipment is in the boat. You can forget tackle and use the boat, but you can't forget safety equipment. If you have an onboard charger, make sure all lights show batteries fully charged and unplug drop cord. Every time you launch the boat. Disconnect tiedown straps Trim motor up and remove tilt locking device Verify/install drain plug. Depending on how steep the ramp is, you may or may not want to undo winch strap. If you towed a long distance and have bearing buddies, now would be a good time to give them a little shot of grease to make sure the centers are floating on the spring. If you have trailer brakes, set your locking device so you can back up. Don't forget to set your park brake and put vehicle in park before you get out. Every time you load the boat on the trailer. Don't forget to set your park brake and put vehicle in park before you get out. Secure tie down straps Set your trim locking device Remove drain plug. Visually inspect the boat to ensure everything is secured and Power switch if off on console. Every time you disconnect the boat from the vehicle. Trim motor down Plug up charger and make sure it shows it's charging. Trailer lights and chains or disconnected from vehicle. These are just some of the key things you need to make sure you do every time.
-
Look at your prop and see what pitch it is. Should be around the inner hub if the nut and washer don't cover it up. If it's a 19, and the motor will spin it to near max recommended rpm, probably in the low 40's. If it's a 21 and the motor will spin it close to max, then upper 40's might bump into 50 a little. I doubt it's a 23, but by change it is, then you might get into mid 50's. A lot depends on the setup, but a 115 on that size boat sounds a little small. I'm a firm advocate of having as much hp as the hull is rated for. That hull may only be rated for a 115 but I would think it would be closer to 130. Now, understand, don't think you can just throw a bigger prop on and it will go faster. It will come closer to going slower than faster. The only time you should consider a higher pitch prop is when you are at least 200-300 rpm over max recommended. Then a bigger prop might give a little more speed, but the whole shot will suffer. Whole shot might be a bit of and issue with two people, full live well, gas and gear.
-
Welcome to the site, and you are right, there is a lot of knowledge base that hangs out here. Yes, I do know at least a nickels worth about the OMC's You got lucky the boat/motor was not one year newer. If it was a 98 115 Ficht I would have to say good luck!. a; Any and all outboards can have problems but as for an OMC 115, you probably got about the best one built. I am a firm believer in that it does more damage to a boat, motor or automobile to sit for long periods of time than it does to operate them. You said the water pump was replaced, how recent, if not within the past couple of years, it needs to be replaced. Not being run to keep them flexible and they develop a set in the blades so they don't flex out into the large cavity. All hoses need to be check to ensure they are still flexible an don't show signs of hardening and dry rot cracks. Overall sounds like you got a nice rig.
-
I don't tow with rods on the deck either, they are in the locker. However when the boat runs faster on the water than you tow it down the highway, and getting bounced around way worse, you kinda want something holding them you can depend on when you have it aired out. I noticed my original bungee straps started showing cracks, like a dry rotted tire, so I replaced them. Good thing too, after installing the new ones, after just a small amount of extra stretch and the old ones broke. I contribute that to the fact my boat spent its first 4 years in Phoenix Az. Also, those with the big hooks and eyelet are bungies also, they are just molded into one pieces on the ends, so you can't just replace the elastic strap when the time comes. The small hooks shown in the first one come apart and you can replace the elastic strap, if you can find it.
-
Actually, those are the ones I was talking about on my Javelin. They used to show them with an eyelet that mounts in the side of the gunwale so you can push them back in, out of the way when not using them. The link below shows the eyelet, but my straps have the small hook like the other link. https://www.ebay.com/p/T-h-Marine-RHD1DP-Rod-Hold-Down-Strap-12/1020420090?iid=202326885923&chn=ps The small hooks have a sleeve that slides over a couple of compression tabs to hold the strap. If you are careful, you can replace just the rubber strap, if/when one breaks. Those compression tabs break off very easy though, so you have to be extremely careful.
-
If you have a DVM and know how to use it, it's easy enough to check your charger, and if the batteries have caps on them you can open the check the levels, it's easy to check the batteries with a $10 hydrometer, one with the floating indicator, and not one with the funky balls in it.. The voltage level for a fully charged battery is based on the type electrolyte in it. Cranking batteries will typically have 12.6VDC when fully charged and let rest for 24 hours. Fully charged deep cycle TM batteries will typically have 12.8VDC after sitting 24 hours and some will show as much as 13VDC. To check that, you need to unplug your charger and wait until the next day to test them. One note, that has to be done right after the charger has gone into the maintenance mode. If the charger cycles on and off, then you don't know what part of the self discharge stage the battery is in. If the charger has a float mode, when it has fully charged the batteries and goes into the float mode, you should see between 13.2 and 13.4VDC on the batteries. If it's one that cuts off and turns back on when the batteries have self discharged for a certain level, the batteries can read anywhere between their fully charged level and the self discharge level they are at until they finally drop enough for the charger to come back on. When you first plug the charger in and it's charging the batteries, you should read over 14VDC on the batteries, typical charging voltage is 14.4 to 14.6VDC. All this can be checked with a digital volt meter (DVM) very easily. The condition of the batteries can be tested with the hydrometer if the caps come off. That's still the best way to test them. If the caps don't come off, you have to use a Midtronics Tester. A 100 amp load tester comes in pretty handy also if you know how to use it. The key things you are looking for there is the voltage drop and how quick the battery recovers after turning the load tester off.