cidgrad96
Members
-
Joined
-
Last visited
Everything posted by cidgrad96
-
Here's a Quantum rod I did a little while back. A lot of the time once you remove the cork it's a mess underneath. Don't expect a nice clean blank. It's going to be scarred, have epoxy all over it, etc. Once you get that epoxy off, the blank is not going to look like the rest of the rod. Come up with ideas on how to cover that section over and it will look great. Other wise it will really look homegrown. Nothing wrong with that, but just an FYI.

-
Take a look at RBO and the post somewhat relative to this thread... http://rodbuilding.org/read.php?2,304662
-
Rock on! It's addictive...
-
Lure weight is what will load the rod regardless of action. I know guys that skip with fast and some use XF. Depends on technique.
-
I wouldn't be surprised to see micro guides show up on 2 - 4 production line rods...
-
A lot depends on your technique and types of lures for that technique. Dropshot/Shakey Head/Finesse Worm (spinning): 6'6" - 7', med/med light rod Crankbait (baitcaster): 8' if possible, power dependent on crank depth/size, moderate action, although I use graphite blanks which have very soft tips and XF action very successfully. I'll respectfully contradict Reel here because there are plenty of great all graphite rods out there for cranks. Go graphite if you want lighter - glass if you want a slower response. Topwater: (baitcaster): 6' - 7', power and length based on lure weight and retrieve technique. Gunfish 95 needs something different than a 1.5oz pencil popper. Flippin'/Pitchin' (baitcaster): 7'6 8' with 8' being better, very strong butt section - fight should be in the middle of the rod. Swimbait (baitcaster): Soft tip if treble hooks, with appropriate power for lure rating (sebile is not the same rod as for a triple trout). 7'9 8' one piece
-
The RX8+ is black. The RX8 is titanium something (silver looking sorta). Significant price difference. Look at 6 posts up.
-
If you are really on a budget, get a bucket, cut a v notch in each side, and use a thick book for your thread tensioner. There are a lot of factory rods wrapped in this fashion!!! Adding to Eddie... I know plenty of guys who made their own wrappers. It's not hard to build something basic and a good way to save a few dollars.
-
If you fish "power hand" and are right handed, you want left handed reels. If memory serves me correctly, the concept is you cast right handed and never loose a beat because you're not switching hands - lure hits the water and you can start reeling immediately. Rich Forhan's "Power Hand Baitcasting" (I think that's the book title} goes into great detail about the technique and maximizing the cast and all. Most guys I know hate to reel left handed and they cast right and switch hands. I do the same. Like Dink said, for flippin/pitchin, I just learned how to cast left handed so I didn't need a dedicated reel.
-
No offense, but you're reading here. That book is an absolute great source of information. If you really want LOTS of good info, go to www.rodbuilding.org. It's way more than you will ever sit and read. If you want lots of input, do a search for new builder posts look through that, then post there. Lots of guys with many years of experience. You can go as basic as you want, or full tilt. Hand wrapper Drying motor Epoxy brush or spatula rod finish rod bond or equivalent thread burnishing tool razor blades reamers color protector (optional) You could probably get by with that (and I may be forgetting something). I started with one of the mudhole kits and it was everything I needed for my first few rods. When I found I really loved building, it slowly grew. More rods than I care to count later, I have about 300 sq ft of my house dedicated to rodbuilding... rod lathe, wood lathe, more tools than I could use because you always need a back up, wall mounted drying rack... and so on.
-
ReelMech suggested Tom Kirkman's "Rod-Building Guide" in his sticky post. For the money, I don't think you can find a better book to get started. Sky is the limit on what you can buy. Start small and see how you like it. SOme find it theraputic, some find it frustrating. BUild a couple before you make huge investments. Read the book first. It really will help you understand what all "the stuff in the kits" is for and you can decide if you need it.
-
Dock - Just how it was said. Weight is added. Some people would view 3 grams as bad because it is adding weight. Some see 3 grams as irrelevant because it is a very small amount.
-
I would rough up the surface to be painted with a grey scotchbrite pad. Yes, you're going to have to take it apart. You could tape off anything you don't want painted, but it's probably easier to take it apart. You got me wanting to try doing one this weekend!
-
Dock - painting those reel seats added 3 grams. So yes it does add weight.
-
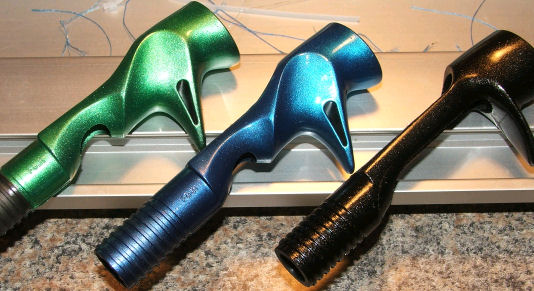
From my experience painting reel seats, your best bet is going to be auto paint with a good auto clear coat over it. I had a guy who painted reels show me how to do it and I applied what I learned to reel seats. I use an adhesion promoter, three light coats of paint, then three light coats of top clear coat. Seems to be durable. just like a car though, and the factory finish on lots of reels, if it gets rubbed enough in the same spot, it's going to come off. These below - all have the auto clear coat. The green and blue are creatix airbrush paints, the black metalflake is auto paint. You can really do some cool stuff if you experiment.

-
I always take pop tarts in the boat with me.. you don't? ;D ;D ;D
-
Honestly... i don't know yet! This one is my first on a rod test. I've tried several paints and a couple finishes. Let them cure good, tried scuffing them on the concrete, leaving them in the sun to watch for fade, testing for weight change, and so on. Should be pretty tough as this is an automotive finish. We'll see! I'm also going to spray paint some accents on the blank so I will repost after this weekend. Got to get over to my father's to use his airbrush. I get ALL the experimental stuff - my rod locker looks like a freak show.
-
I sanded that EVA down with 1500 grit. Gives a real different finish. Almost doesn't feel like EVA.
-
Going to be my new worm rod - started on tonight. Trying to get the hang of that japanese look without using a handle kit. Got a couple more things I'm going to do with it and then the label will be in red to match. Painted the reel seat. Wish I could have found a black with red metalflake. Going to tie it all in though.

-
Don't understand what your question is... You asking how to measure lure weight? How to match the rod to the lure? What size lure you should be throwing?
-
Probably one or one and a half.
-
After you play with it a while, let me know what you think. Maybe you can find something better we can all benefit from. Just try that spacing in "reverse" for the butt guide. It's a different way to look at it.
-
dick - could be the difference in blanks that allows me to space out that far? - but I've also used 3 different brands with the same results. Personally I use a 6, 4, 3s set up on pretty much 98% of my rods. I don't use any DFs. 30" is a generalization. Some rods are at 27" and some work on up to 30", but the majority is closer to the 30" mark. Every blank is a little different. In test casting and builds, I've seen measureable improvements in casting distance with this set up on top. To space the butt guide, I don't go from the tip down. I load the rod and space the butt guide first - exactly like I would any other guide with the line just above the blank from the reel to the butt guide - maybe a hair away from touching the blank. Then I go back and start from the tip and work down making adjustments as needed. Some times I can slide the butt guide closer to the reel. Here's a big catch (and improvement in my mind)... I then UNLOAD the rod and look at the line path. I don't like the line to come off the reel and then have a large change in angle once it hits the butt guide. With larger guides you can get by with the butt guide closer. Smaller guides need to be further away to minimize this angle. New can of worms with DF vs. SF! That's another thread. I've got 60+ rods out there this year with this set up and it seems to be making folks really happy so I go off the feedback! I'm open to ideas too. Always looking for the next big step forward in performance.
-
7' minimum length rod and need a bit of flex in tip, with a minimum of a 5 (or heavy) power rod. Tip to throw, backbone to handle hookset and fight. Braid 50 # if in heavy grass - no grass can go lighter on line #. 7:1 reel. Rod choice also dictated by the size of frog or rat. A 6" rat isn't going to be the same as a Fleck's Flex Frog. - Alex
-
bow is right. The RX7s are good blanks and good warranty. Another option is to call Lance over at Swampland Tackle - great guy and has everything to set you up in a castaway style kit. Good blanks there too. They have a great warranty too as you deal directly with them.. not castaway. Alex