Fishing Rhino
Super User
-
Joined
-
Last visited
Everything posted by Fishing Rhino
-
Here ya go. Try this. http://www.westsystem.com/ss/repairing-a-royalex-canoe-with-g-flex-epoxy
-
You can try fiberglass, but I doubt it would work, even if you used an epoxy resin. Google "repairing Royalex canoes", and see what you get. Try below as a last resort. I'd try 3M 5200. It is available in "toothpaste" tubes or tubes that will fit in caulking guns. You will also need a flexible plastic spreader. Home Depot carries 5200. Drill a small hole at the end of each crack. That will help prevent the crack from "growing. Clean the area around the cracks on the inside and outside. Scuff the area about an inch on each side and each end of the cracks with sandpaper. Wash the scuffed area with acetone or lacquer thinner. Then put a 3/8th inch bead of the 5200 over the crack, on the inside and outside of the hull. Place a piece of wax paper over the bead. It should be about five or six inches wide, and long enough to extend about three inches past the end of the crack. Use the spreader, and spread the bead evenly on both sides of the crack, and past the ends. Again, do this on the inside and outside of the hull. You want it to be a little thicker in the center tapering to a feathered edge. Then leave it alone until it sets. It may take a few days, so do this when you aren't planning on using the boat. To see if the material has cured, gently try to spread the material with a finger tip. The wax paper should still be in place. If you cannot move the material, slowly, try to remove the wax paper. If the 5200 lifts, use the spreader to put it back in place. Once it sets, the wax paper will easily peel off, leaving a fairly smooth surface.
-
My biggest accomplishment while bass fishing was rescuing two people who had capsized their boat in the middle of a small pond. There were two other incidents in which I rescued two people who thought it wise to try to swim across a small pond and were lucky that a buddy and I happened to come along just in time, and the other when we came upon a burning boat on the ocean and headed directly into the breeze to find a man in a raft thirty miles offshore, six miles from the burning boat. Those had nothing to do with bass fishing. Just a case of being in the right place at the right time.
-
Fish blood clots instantly in water. The next time you catch a bleeding fish, lip it, and place it in the water. Watch the blood clot instantly when it hits the water. Fish bleed when fighting because the blood does not get a chance to clot, or the hook keeps injuring the tissue causing it to bleed. Get a good lip grip on the fish to stop it from thrashing. Dip it underwater, then carefully remove the hook to keep damage to a minimum. Use a long nose instrument, I prefer curved forceps, others like needle nose pliers, for the procedure. Your results will improve with practice, so don't be discouraged if you occasionally butcher the job when you are starting out.
-
No it's not always a death sentence. I've caught bass with a gill trailing out beyond the gill plate, having been parted at the upper end. One of them I caught twice, a month apart.
-
I have a couple of buddies that I fish with. We alternate boats and no money changes hands. However, the "guest" brings the lunch and drinks. In addition, the guest writes up a report on the day and posts it to all of us via the private message system on the forum. In addition to the "catering", the guest also provides the valet service. They take the rig to the parking lot, and then get it when it's time to go. Don't assign anyone the valet detail unless you know that they know what they are doing. We have "The Al Lindner Award" for each outing. It goes to the angler who hooks up with the most species. That is always good for a laugh. We quibble over such things as, do snagged mussels count as a species? After all, it is a shellfish. I snagged a duck that was flying by, and tried to claim it as a species because it's a waterfowl. The possibilities are endless. If I invite someone and they ask what they can do, I'll assign them the lunch detail. I don't expect them to share expenses because they are invited.
-
Boston Whaler started the unsinkable brigade by cutting one of their boats in half over fifty years ago. You could still fish out of this one. https://www.youtube.com/watch?v=zaNBKfQCze0&feature=player_detailpage
-
Here's a simple solution. A candle and a safety pin. Open the safety pin and heat it in the candle. Then melt a hole where you want to insert the bait holder (screw type, barbs or whatever). Then, put a drop of super glue in the hole when you want to rig it. Quickly slide it over the holder, and let the glue set up. Make sure you have the bait lined up before the glue sets up. It's hard enough just to push the hook through elaztech baits, and impossible to push or twist the "holders" into the elaztech material.
-
See above.
-
-
Be prepared, when you remove the deck, you may find that the stringers, and any cross members may need replacing as well. It's an old boat, and quite likely that there has been water intrusion to the wood components beneath the deck. These are crucial, structural members that provide strength and stiffness to the hull. They need to be shaped to conform to the hull, and the tops of all these members have to be in line or your deck will be distorted. You may find the plywood core of the transom is rotten as well. All these parts can be replaced, but it will take time, and more than a few dollars. If you undertake the project, and the core of the transom does need replacing do not damage the outer layers of laminate. You can remove the inside layer which will make removing the core easier. Epoxy should be used to bond the new components of the core to the outer skin, and each other. If you like doing this type of project and are familiar with basic woodworking tools it can be a fun project.
-
From what the owners manual for my Merc says, they recommend trailering with the motor in the down position. They specifically state that the tilt lock should not be used when trailering. Neither should the power lift be used to keep the motor in a raised position while trailering your boat. There is little doubt that today's transoms can take the strains of over the road travel. However, the question is, do you want to risk damaging the lower unit should it make contact with the road? Railroad tracks, sharp grade changes such as those found when turning into parking lots, or off the road, speed bumps, etc. can cause serious damage. I have a spring loaded transom saver which has about two inches of spring travel from fully compressed to unloaded. I install the transom saver and compress the spring about one inch. This allows the spring to absorb road shock while towing.
-
The fuse for the trailer circuit is usually found under the hood. When you remove the cover to the fuse panel, there should be a schematic on the inside of the cover which tells you what each fuse is used for. There may be two fuse panels on some vehicles. It should also be in the owner's manual for your particular vehicle. If you do not have one, search online. I found this one for my 2008 GMC Sierra Fuses 3, 6, 10, and 24 are for the trailer connector.
-
Go back to step one. The brake lights worked which means they had a ground. Unless I'm mistaken, a tail light has three wires, one for the ground, one for the tail light, and the other for the brake/signal/hazard flasher lights. That tells me the ground for the tail light assembly is okay. Does your trailer have other marker lights along the sides. If so they should go on the same circuit as the tail lights. What type of plug do you have? It should have at least four connectors, one ground, one for the running lights, one for the left brake/turn signal/hazard flasher, and one for the right brake/turn signal/hazard flasher. They should be color coded, each being a different color. You can buy a cheap automotive circuit tester at a hardware store. All you need is the type that lights up when a circuit is on. They can be found for about ten bucks. Start with the plug on your vehicle. Turn the lights on and the hazard flasher. Find the ground, make a connection to the ground, then touch the other lead to each of the other contacts on the vehicle's plug. You should get a steady light on one. That will be for your running/tail lights. You should find two that flash. Those will be your brake/turn signal/ hazard light contacts. To determine which is which, turn off your hazard flashers, then activate your turn signal, either left or right. You should have one contact that causes the tester to flash. That will be the lead to the side you activated with the turn signal. Once you have determined that the plug on the vehicle is functioning properly, you can go to the trailer. You now know which wire on the plug does what. Make a drawing so you can identify each. Then connect your trailer plug. Note which color wire is for the ground, the running lights, the left and the right turn signal/brake lights. Make the proper connections and you should be in business. Be sure to check the plug on the vehicle first to make sure it is okay. Many vehicles have two dedicated circuits for the tail light operation. One for the vehicle, and another for a trailer. The lights may work fine on the vehicle, but have a blown fuse on the trailer circuit. You may have created a short with those two long ground wires and blown a fuse on the trailer circuit.
-
Congrats. I like the daddy proof outfit, but unless it's not in the photo, it needs a "front" and a "back" on it. I know from experience.
-
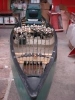
Your pole should look like the second from the left. If you look at the collar from the plug end of the pole, you will see that the hole in the collar is not centered. It is slightly offset. The hole in the mount on the boat for the collar is also slightly offset from the hole for the pole. When the pole is inserted, rotate the collar until it easily drops into place. Then, when you turn the collar, it puts pressure on the assembly which keeps the pole in place. There is a groove in the hole for the pole. The pin on the side of the pole must line up with the groove when you install the light assembly into the receiver. That lines up the electrical connections on the pole and the receiver. Keep the collar out of the way until the pole is fully inserted. Then slide the collar down and turn until it can freely drop into place in the receiver. Then, twist the collar until it is snug. It will take less than half a turn to lock the pole in place, maybe less than a quarter of a turn.. Remember to twist the collar in the opposite direction when you want to remove the light.
-
Do you mean sand down the plastic collar? If so, the answer is no. When you have the pole inserted, turn the plastic collar until it gets in a position where it will slide all the way down easily. The collar is not threaded. As you turn the collar, it will make the assembly bind the pole to hold it in place. Turn the collar the opposite way to release the bind. It doesn't matter which way you turn the collar to make it tight. But, you will need to turn the collar in the opposite direction to release it. If you sand the collar down, it will not be able to bind the pole in place. For me, to keep it simple, I turn the collar clockwise to make it bind. To release the pole, turn the collar counter clockwise. You do not need to put a lot of pressure twisting the collar. Just make it good and snug. Do not tighten it as hard as you can, or it may be difficult to release.
-
You can also just fill the hole with silicone. Let it sit overnight, then reinstall the screws. The screw will drive into the silicone, which is set, compressing it between the hull and the screw, making a watertight seal.
-
Dielectric grease is your friend. Use it generously on both the male and female connectors. Also, use it on all the light bulbs. It will make replacing them a breeze. I'm guessing that your plastic "collar" is eccentric (out of round). They are made this way to secure the light pole into the socket. The light pole can be a bear to remove if you do not get the collar in the fully released position.
-
Joan Rivers grew a beard after her last face lift.
-
An Interstate Battery store should have, or be able to get the smaller size batteries.
-
Try a local tire dealer. Many will provide a road hazard guarantee with the sale, free tire rotation, and repairs for the life of the tire. Their prices are usually competitive. They may not match the price of tires you purchase online, but the services they provide with the sale more than makes up for the few extra dollars you might save. If you have a BJs Wholesale Club near you, check them out. They usually have a better price and also may provide the road hazard guarantee, rotation and repairs with the sale.
-
They must have a dynamometer for outboards. It seems to me that the manufacturers could perform the break in procedure on a dyno for each engine, on the assembly line, under computer control, taking out most of the labor costs. Even if it added five hundred bucks to the cost of an engine, particularly the expensive larger engines, it would be money well spent by the consumer. The break in hours are the most critical hours in the life of an outboard. Failing to do it properly can greatly reduce the life of an engine. On top of the above, consider this. Everything you do during, and after the break in period is recorded on the motor's computer. Failing to follow the instructions to a "T", during break in, may void the warranty, costing the owner thousands of dollars in the event of engine failure.
-
The break in period is the first "6" hours of running time. It doesn't matter if you do it in one outing, or over several outings. Just be sure to follow the manufacturers instructions for the break-in period.
-
My 09 Z-7 was atrocious to get up on plane. This was pre RPS (rapid planing system). It was much like yours, taking forever at times to get up on plane. The problem was solved by putting on a prop with more, not less pitch. What do you turn for RPMs at full throttle? On my Z-7, it would occasionally over rev, setting off the alarm. When I took it back to BPS, their "expert" asked me if I had changed the prop. Told him no. He asked again. I told him I would certainly remember changing the prop. He then said it was not the correct prop and they replaced it with a prop that had two or three more inches of pitch. It still wasn't the best at getting up on plane when loaded with fuel and another fisherman, but, it was a great improvement. Get to half tank of fuel or less, and it would jump right up on plane. It had a 150 hp Merc. It also revved considerably less when taking off at full throttle. The Z-8 I have now gets up on plane easily with a 200 Merc on the stern, and the RPS hull. They may have gone the wrong way on the pitch.